Ubuntu 26.04 LTS (Resolute Raccoon)のインストールと初期設定・環境構築について。
- 目的と内容
- 最小インストールを用いてクリーンインストールする
デスクトップPCを開発機として構成する
インストール時に実施した手順、各種設定の内容を記録し、次回インストール時のベース・変更点の検証材料とする - 本文の構成
-
- §.インストール
-
autoinstall.yamlによるインストール構成の作成
autoinstall.yamlを使ったインストール
などを行う - §.インストール後・初回起動後の設定
-
カスタマイズ済みの設定ファイル・dotfilesの展開
autoinstall.yamlで行なった設定の確認
不要なaptパッケージの削除
などを行う - §.デスクトップ環境の設定とカスタマイズ
- デスクトップアプリの初期設定などを行う
- §.開発環境の設定
- 開発環境や各種サーバーの初期設定を行う
インストール
ISOイメージubuntu-26.04-desktop-amd64.isoを用いてライブメディアを作成してインストールする。
Ubuntu 26.04 Desktopのインストーラーでは、LVMパーティションを用いたストレージ構成でのインストールを行うように手動設定できないため、ここではautoinstall.yamlを用いて自動インストールを行う。
autoinstall.yaml
ここではストレージ構成を含む各種設定を、以下の要項で記述した。
- UEFI環境にインストールする
- 事前に作成済みの、LVMパーティションを含むストレージ構成を使用する
- 最小構成のUbuntu Desktop(
ubuntu-desktop-minimal)をインストールする -
packages:にてインストール中・インストール直後の設定で必要なAPTパッケージ類をインストールする -
snaps:にてインストール後に使用予定のsnapパッケージをインストールする
またlate-commands:にて設定ファイル類の追記・変更を行い、初回起動の時点でファイルシステム・ネットワーク・サービス類がある程度構築済みの環境となるように構成する。 これにより、手動での設定ファイル編集の手間を減らす。
-
/etc/default/grubを編集してテキスト表示でブートするようにする- インストール直後の初回起動時に問題把握しやすいようにする
- 構成済みのネットワーク設定が利用できるように、Netplan設定ファイルを配置する
- NetworkManagerを無効にし、Netplan + systemd-networkdによる管理に切り替える
- インストール完了に使用したいパッケージ類をインストールする
packages:でのインストールでは、一つずつインストールされるため時間がかかるので初期設定に必須のパッケージのみとするlate-commands:では、それ以外の必要なパッケージを一括してインストールする
- CUPSを無効化・削除する (使用しないため)
- デフォルトエディタをvimに変更する
-
/etc/aliasesに宛先メールアドレスを追記してnewaliasesで更新するubuntu-desktop-minimalではPostfixが自動的にインストールされる
- ufwを設定する
- NTPサーバー(chrony)を設定する
-
/etc/fstabに追記する -
/etc/hostsに追記する
#cloud-config
autoinstall:
  # reference
  #   Autoinstall configuration reference manual
  #   https://canonical-subiquity.readthedocs-hosted.com/en/latest/reference/autoinstall-reference.html
  #
  #   curtin documentation
  #   https://curtin.readthedocs.io/en/latest/index.html
  version: 1

  # インストール前に実行するコマンド
  early-commands:
    # 以下のストレージ設定ではUEFIブートとなっていることを前提としているため、
    # 起動したライブインストール環境がUEFIブートでなければ、中断する
    - |
      if [ ! -d /sys/firmware/efi ]; then
        echo "このメディアはLegacy BIOSモードで起動しています。UEFIモードで起動し直してください。" >&2
        exit 1
      fi

    # インストールに使用するLVMボリュームを(念の為)有効にしておく
    - vgchange -ay vg-system

    # 既存のスワップ領域パーティションを再利用する場合、ライブ環境がそのパーティションを
    # 有効化・マウントしてしまい、インストーラーが使用中と判断してしまうため、
    # インストールの開始時にスワップをすべて停止しておく
    - swapoff -a

  source:
    # 最小構成のUbuntu Desktopをインストールする
    id: ubuntu-desktop-minimal
    search_drivers: true

  refresh-installer:
    # インストーラーの更新は行わない
    update: false

  identity:
    hostname: ubuntu-resolute.smdn.internal
    username: smdn
    password: '$6$xxxxxxxx$xxxxxxxxxxxxxxxxxxxxxxxxxx' # `openssl passwd -6`で生成したパスワードのハッシュ文字列を指定する
    groups:
      append: [sudo, adm, dialout]

  storage:
    version: 1
    # 以下はすでに作成済みのパーティションにインストールする設定
    #
    # `size`によるパーティションサイズの指定が必要な箇所について、正確なサイズでないと
    # インストーラーがエラーを報告する場合があるようなので、その場合は以下のようにして
    # バイト単位でのサイズを指定する
    #   `sudo parted /dev/sda unit B print`
    #
    # 特に、`preserve: true`を指定して既存パーティションをそのまま使う場合に`size: -1`を
    # 指定すると、-1は確保可能な(ディスク末尾までの)最大サイズと解釈される(?)一方、
    # この値は既存パーティションと異なるサイズと判断される(?)ため、インストーラーによる
    # ディスク検証でエラーとなる場合がある模様
    #
    # `path`でのディスクの指定について、`/dev/disk/by-id/...`などudevによって作成される
    # シンボリックリンクでは正しく認識されずエラーとなるので、必ず/dev/sdaなどのパスを
    # 指定する必要がある模様
    #
    # `storage`の記述内容は、以下のように`curtin schema-validate`を使用することで検証できる
    #   sudo apt install git python3-yaml python3-setuptools
    #   git clone https://github.com/canonical/curtin
    #   cd curtin/
    #   sudo python3 -m curtin schema-validate -s -c autoinstall.yaml
    #
    config:
      #
      # ESP, /boot, /(root)を配置するパーティションのあるディスク
      #
      - id: disk-system
        type: disk
        path: /dev/nvme0n1
        preserve: true

      #
      # ESP(/boot/efi) - /dev/nvme0n1p1
      #
      - id: partition-esp
        type: partition
        device: disk-system # /dev/nvme0n1
        number: 1 # /dev/nvme0n1p1
        preserve: true
        size: 250M
        flag: boot
        grub_device: true # このパーティションを/boot/efiとして使用し、GRUBをインストールする

      - id: format-esp
        type: format
        fstype: fat32
        volume: partition-esp # /dev/nvme0n1p1

      - id: mount-esp
        type: mount
        path: /boot/efi
        device: format-esp

      #
      # /boot - /dev/nvme0n1p2
      #
      - id: partition-boot
        type: partition
        device: disk-system # /dev/nvme0n1
        number: 2 # /dev/nvme0n1p2
        size: 500M
        preserve: true

      - id: format-boot
        type: format
        fstype: ext4
        volume: partition-boot # /dev/nvme0n1p2

      - id: mount-boot
        type: mount
        path: /boot
        device: format-boot

      #
      # / (root) - /dev/vg-system/lv-root on /dev/nvme0n1p4
      #
      - id: partition-lvmpv-system
        type: partition
        device: disk-system # /dev/nvme0n1
        number: 4 # /dev/nvme0n1p4
        size: 200G
        preserve: true

      - id: lvmvg-system
        name: vg-system # /dev/vg-system
        type: lvm_volgroup
        devices:
          - partition-lvmpv-system # /dev/nvme0n1p4
        preserve: true

      - id: lvmlv-root
        name: lv-root # /dev/vg-system/lv-root
        type: lvm_partition
        volgroup: lvmvg-system # /dev/vg-system
        size: 40GB
        preserve: true

      - id: format-root
        type: format
        fstype: ext4
        volume: lvmlv-root # /dev/vg-system/lv-root

      - id: mount-root
        type: mount
        path: /
        device: format-root
        options: noatime

      #
      # swapを配置するパーティションのあるディスク
      #
      - id: disk-variable
        type: disk
        path: /dev/sdb
        preserve: true

      #
      # swap - on /dev/sdb1
      #
      - id: partition-swap
        type: partition
        device: disk-variable # /dev/sdb
        number: 1 # /dev/sdb1
        size: 20000000000B
        preserve: true

      - id: format-swap
        type: format
        fstype: swap
        volume: partition-swap

      - id: mount-swap
        type: mount
        path: none
        device: format-swap

  network:
    version: 2
    # 以下省略、インストール時に使用するネットワーク設定を、
    # Netplanの設定ファイルと同様の形式で記載しておく
    ethernets:

  # 以下はautoinstall.yamlの読み込み前に(インストーラーで)設定しているはずだが、
  # 今後autoinstall.yamlの設定値が参照・上書きされる場合を考慮して念の為記載しておく
  locale: ja_JP.UTF-8
  timezone: Asia/Tokyo
  keyboard:
    layout: jp

  packages:
    - ca-certificates
    - curl
    - git
    - gpg
    - iputils-ping
    - mdadm
      # mdmadmをインストールさせることにより、システムに接続されている既存のRAIDアレイの
      # 自動スキャンとmdadm.confの再作成を行わせ、同時にinitramfsの更新も行わせる。
      # これにより、初回起動時にRAIDアレイが構築されていないことによる問題を回避する。
    - rsync
    - tree
    - ufw
    - vim

  snaps:
    - name: firefox
    - name: thunderbird
    # インストール時に`--classic`オプションの指定が必要なパッケージでは
    # `classic`をtrueにする
    - name: code
      classic: true
    - name: gh
      classic: true
    - name: powershell
      classic: true

  drivers:
    install: true

  # インストール後に実行するコマンド
  late-commands:
    # GRUBのデフォルト設定を上書きする内容を追記する
    # - GRUB起動メニューを表示する
    # - GRUB起動メニューでのタイムアウト時間を3秒にする
    # - ブート中に表示される内容をスプラッシュ画面からテキスト表示にする
    - |
      curtin in-target -- sh -c '
      cat << '"'"'EOF'"'"' >> /etc/default/grub
      # override default configurations
      GRUB_TIMEOUT_STYLE="menu"
      GRUB_TIMEOUT="3"
      GRUB_RECORDFAIL_TIMEOUT="$GRUB_TIMEOUT"
      GRUB_CMDLINE_LINUX_DEFAULT="noquiet nosplash"
      GRUB_CMDLINE_LINUX=""
      EOF

      update-grub
      '

    # Netplan設定ファイルを作成・適用し、systemd-networkdを使用するようにする
    - |
      curtin in-target -- sh -c "
      # networkdを有効にする
      systemctl enable systemd-networkd

      # cloud-initによるNetplan設定ファイルの自動生成を無効化する
      cat << 'EOF' > /etc/cloud/cloud.cfg.d/99-disable-network-config.cfg
      network: {
        config: disabled
      }
      EOF

      # インストール時・既定のNetplan設定ファイルをリネームして無効化
      for f in /etc/netplan/*.yaml /etc/netplan/*.yml; do
        if [ -f \"\$f\" ]; then
          mv \"\$f\" \"\$f.disabled\"
        fi
      done

      # バックエンドをnetworkdに設定するNetplan設定ファイルを作成
      cat << 'EOF' > /etc/netplan/10-networkd.yaml
      network:
        version: 2
        renderer: networkd
      EOF

      # イーサネットデバイスを構成するNetplan設定ファイルを作成
      cat << 'EOF' > /etc/netplan/11-networkd-ethernets.yaml
      network:
        ethernets:
          # 以下内容は省略
      EOF

      # パーミッションを修正し、root以外が読み書きできないようにする
      chmod og= /etc/netplan/1*-*.yaml

      # ネットワーク設定ファイルを生成・適用する
      netplan --debug generate
      netplan apply
      "

    # 追加のパッケージをインストールする
    - curtin in-target -- apt-get update -y
    - >-
      curtin in-target -- apt-get install -y
      build-essential ca-certificates clang cmake curl dotnet10 fcgiwrap
      fonts-noto-core fonts-noto-cjk fonts-noto-cjk-extra fonts-noto-mono
      gedit gedit-plugin-draw-spaces git gir1.2-gtop-2.0 gpg
      ibus-mozc iputils-ping libreoffice-calc libreoffice-l10n-ja
      lm-sensors logwatch mozc-utils-gui nginx-extras nkf pkgconf
      php-fpm php-mbstring rsync synaptic tree ufw vim xclip

    # デフォルトエディタをvimにする
    - curtin in-target -- update-alternatives --set editor /usr/bin/vim.basic

    # root宛て・一般ユーザー宛てのメールアドレスを設定する
    - |
      curtin in-target -- sh -c "
      cat << 'EOF' >> /etc/aliases
      root: root@mail.example.com
      user: user@mail.example.com
      EOF

      newaliases
      "

    # UFWを設定する
    - |
      curtin in-target -- sh -c "
      ufw default deny incoming
      ufw default allow outgoing
      # 中略
      ufw --force enable
      "

    # マウント先のディレクトリを作成し、/etc/fstabにマウントポイントを追記する
    - |
      curtin in-target -- sh -c "
      mkdir -p /srv/www

      cat << 'EOF' >> /etc/fstab
      #
      # /etc/fstabに追記する内容を記述する
      #
      EOF
      "

    # NTPサーバー(chrony)を設定する
    # ここではntp.nict.jpおよびntp.jst.mfeed.ad.jpを追加する
    - |
      curtin in-target -- sh -c "
      sed -i 's/^pool /#pool /g' /etc/chrony/sources.d/ubuntu-ntp-pools.sources
      mkdir -p /etc/chrony/sources.d
      cat << 'EOF' > /etc/chrony/sources.d/custom-ntp.sources
      server ntp.nict.jp iburst
      server ntp.jst.mfeed.ad.jp iburst
      EOF
      chronyc reload sources
      "

    # CUPSを無効化・削除する
    - |
      curtin in-target -- sh -c "
      systemctl disable --now cups-browsed.service cups.service cups.socket cups.path
      apt-get purge -y cups cups-browsed cups-daemon cups-core-drivers cups-server-common
      if command -v snap >/dev/null && snap list | grep -q '^cups '; then
        snap remove cups
      fi
      "

    # 追加のユーザーを作成する
    - |
      curtin in-target -- sh -c '
      groupadd -g 602 git
      adduser --uid 602 --ingroup git --disabled-login --disabled-password --no-create-home --shell /usr/sbin/nologin --gecos "" git
      '

    # /etc/hostsを追記する
    - |
      curtin in-target -- sh -c "
      cat << 'EOF' >> /etc/hosts
      #
      # /etc/hostsに追記する内容を記述する
      #
      EOF
      "
インストールするパッケージ(packages)
上記のautoinstall.yamlのpackagesでインストールする各パッケージの概要は次のとおり。
| パッケージ名 | 概要 |
|---|---|
ca-certificates
|
Common CA certificates |
curl
|
command line tool for transferring data with URL syntax |
git
|
fast, scalable, distributed revision control system |
gpg
|
GNU Privacy Guard -- minimalist public key operations |
iputils-ping
|
Tools to test the reachability of network hosts |
mdadm
|
tool for managing Linux MD devices (software RAID) |
rsync
|
fast, versatile, remote (and local) file-copying tool |
tree
|
displays an indented directory tree, in color |
ufw
|
program for managing a Netfilter firewall |
vim
|
Vi IMproved - enhanced vi editor |
| パッケージ名 | 概要 |
インストールするパッケージ(late-commands)
上記のautoinstall.yamlのlate-commandsでインストールする各パッケージの概要は次のとおり。
| パッケージ名 | 概要 |
|---|---|
build-essential
|
Informational list of build-essential packages |
ca-certificates
|
Common CA certificates |
clang
|
C, C++ and Objective-C compiler (LLVM based), clang binary |
cmake
|
cross-platform, open-source make system |
curl
|
command line tool for transferring data with URL syntax |
dotnet10
|
.NET CLI tools and runtime |
fcgiwrap
|
simple server to run CGI applications over FastCGI |
fonts-noto-core
|
"No Tofu" font families with large Unicode coverage (core) |
fonts-noto-cjk
|
"No Tofu" font families with large Unicode coverage (CJK regular and bold) |
fonts-noto-cjk-extra
|
"No Tofu" font families with large Unicode coverage (CJK all weight) |
fonts-noto-mono
|
"No Tofu" monospaced font family with large Unicode coverage |
gedit
|
popular text editor for the GNOME desktop environment |
gedit-plugin-draw-spaces
|
Draw Spaces plugin for gedit |
git
|
fast, scalable, distributed revision control system |
gir1.2-gtop-2.0
|
gtop system monitoring library (gir bindings) |
gpg
|
GNU Privacy Guard -- minimalist public key operations |
ibus-mozc
|
Mozc engine for IBus - Client of the Mozc input method |
iputils-ping
|
Tools to test the reachability of network hosts |
libreoffice-calc
|
office productivity suite -- spreadsheet |
libreoffice-l10n-ja
|
office productivity suite -- Japanese language package |
lm-sensors
|
utilities to read temperature/voltage/fan sensors |
logwatch
|
log analyser with nice output written in Perl |
mozc-utils-gui
|
GUI utilities of the Mozc input method |
nginx-extras
|
nginx web/proxy server (extended version) |
nkf
|
Network Kanji code conversion Filter |
pkgconf
|
manage compile and link flags for libraries |
php-fpm
|
server-side, HTML-embedded scripting language (FPM-CGI binary) (default) |
php-mbstring
|
MBSTRING module for PHP [default] |
rsync
|
fast, versatile, remote (and local) file-copying tool |
synaptic
|
Graphical package manager |
tree
|
displays an indented directory tree, in color |
ufw
|
program for managing a Netfilter firewall |
vim
|
Vi IMproved - enhanced vi editor |
xclip
|
command line interface to X selections |
| パッケージ名 | 概要 |
インストールを開始
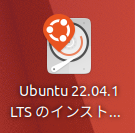
Install Ubuntu 26.04をダブルクリックしてインストールを開始する。
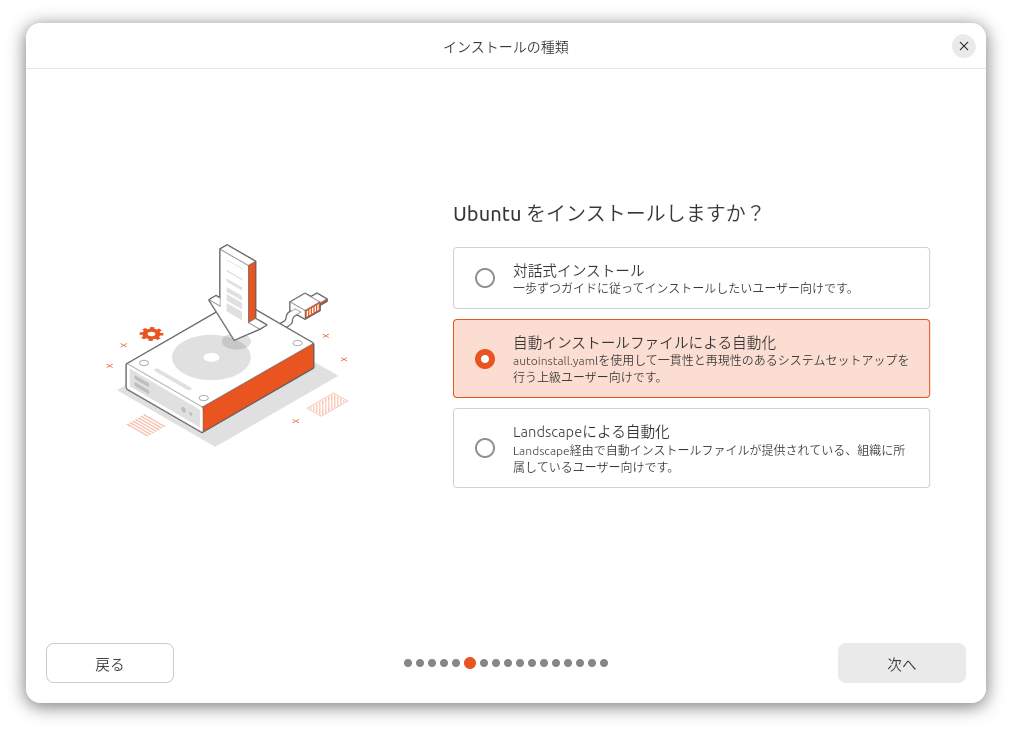
「Ubuntuをインストールしますか?」にて「自動インストールファイルによる自動化」を選択する。 ここでautoinstall.yamlの場所を指定して「インポート」する。 問題なければインストールが開始される。
インストール後・初回起動後の設定
初回起動時は、cloud-initによる構成、snapパッケージのインストールと構成などが行われるため、通常の起動よりも時間を要する。 GRUBの設定でブート画面をテキスト表示にしておけば、ある程度処理内容と進捗が把握できる。
ターミナル・シェル・デスクトップ・その他dotfiles等の設定
dotfiles類を配置し、ダンプしておいたdconfをロードする。
これはごく個人的な設定をまとめたものであるため、そのまま使用することは推奨しない。
$git clone --depth 1 https://github.com/smdn/smdn.git smdn-configurations
$cd smdn-configurations/etc/home/smdn/
$./deploy-dotfiles.sh
$./relocate-cache-directories.sh
$confs/git-configure.sh
$confs/dconf/load.sh
ネットワークの設定の確認
$networkctl status -a --no-pager
NTP設定の確認
$chronyc sources -v
不要なaptパッケージを削除する
以下のコマンドで一括して削除する。 削除目的等については省略。
sudo apt purge \
  aspell aspell-en \
  bolt \
  bluez bluez-cups bluez-obexd \
  brltty \
  cups-bsd cups-client cups-common cups-filters* cups-ipp-utils cups-pk-helper foomatic-db-compressed-ppds ipp-usb \
  enchant-2 \
  espeak-ng-data \
  ftp tnftp \
  gamemode gamemode-daemon \
  gnome-text-editor \
  hplip hplip-data \
  modemmanager \
  nano \
  network-manager \
  openprinting-ppds \
  ppp pptp-linux \
  printer-driver-* \
  rygel \
  sane-utils sane-airscan libsane-hpaio \
  speech-dispatcher speech-dispatcher-audio-plugins \
  system-config-printer-common system-config-printer-udev \
  wamerican
各パッケージの概要は次のとおり。
| パッケージ名 | 概要 |
|---|---|
aspell
|
GNU Aspell spell-checker |
aspell-en
|
English dictionary for GNU Aspell |
bolt
|
system daemon to manage thunderbolt 3 devices |
bluez
|
Bluetooth tools and daemons |
bluez-cups
|
Bluetooth printer driver for CUPS |
bluez-obexd
|
bluez obex daemon |
brltty
|
Access software for a blind person using a braille display |
cups-bsd
|
Common UNIX Printing System(tm) - BSD commands |
cups-client
|
Common UNIX Printing System(tm) - client programs (SysV) |
cups-common
|
Common UNIX Printing System(tm) - common files |
cups-filters*
|
OpenPrinting CUPS Filters - Main Package |
cups-ipp-utils
|
Common UNIX Printing System(tm) - IPP developer/admin utilities |
cups-pk-helper
|
PolicyKit helper to configure cups with fine-grained privileges |
foomatic-db-compressed-ppds
|
OpenPrinting printer support - Compressed PPDs derived from the database |
ipp-usb
|
Daemon for IPP over USB printer support |
enchant-2
|
Wrapper for various spell checker engines (binary programs) |
espeak-ng-data
|
speech data files |
ftp
|
dummy transitional package for tnftp |
tnftp
|
enhanced ftp client |
gamemode
|
Optimise Linux system performance on demand |
gamemode-daemon
|
Optimise Linux system performance on demand (daemon) |
gnome-text-editor
|
simple text editor for GNOME |
hplip
|
HP Linux Printing and Imaging System (HPLIP) |
hplip-data
|
HP Linux Printing and Imaging - data files |
modemmanager
|
D-Bus service for managing modems |
nano
|
small, friendly text editor inspired by Pico |
network-manager
|
network management framework (daemon and userspace tools) |
openprinting-ppds
|
OpenPrinting printer support - PostScript PPD files |
ppp
|
Point-to-Point Protocol (PPP) - daemon |
pptp-linux
|
Point-to-Point Tunneling Protocol (PPTP) Client |
printer-driver-*
|
printer driver for HP-GDI printers |
rygel
|
GNOME UPnP/DLNA services |
sane-utils
|
API library for scanners -- utilities |
sane-airscan
|
SANE backend for AirScan (eSCL) and WSD document scanner |
libsane-hpaio
|
HP SANE backend for multi-function peripherals |
speech-dispatcher
|
Common interface to speech synthesizers |
speech-dispatcher-audio-plugins
|
Audio output plugins |
system-config-printer-common
|
backend and the translation files for system-config-printer |
system-config-printer-udev
|
Utilities to detect and configure printers automatically |
wamerican
|
American English dictionary words for /usr/share/dict |
| パッケージ名 | 概要 |
パッケージ情報を更新してアップデートする
$sudo apt update && sudo apt dist-upgrade
必要とされていないパッケージを削除する
$sudo apt autoremove
再起動
ここまででいったん再起動。 再起動後にps, pstree, topで必要なさそうなプロセスが動いてないかチェックする。
デスクトップ環境の設定とカスタマイズ
Mozcの設定
Mozcの設定(mozc)を起動して設定を編集する。
- [一般]タブ
-
- [キー設定の選択]
- [ATOK]に変更
- [辞書]タブ
-
- [ユーザー辞書の編集]
- [Mozc辞書ツール]を起動でユーザー辞書をインポートする
- [サジェスト]タブ
-
- [サジェストの最大候補数]
- 9にする
Firefox
user.jsを作成して以下の内容を記述しておく。
user_pref("accessibility.browsewithcaret", true); // キャレットブラウズモードを有効にする

user_pref("browser.search.openintab", true); // 検索結果を新しいタブで開く
user_pref("browser.search.widget.inNavBar", true); // 検索バーをツールバーに表示する
user_pref("browser.startup.page", 3); // 起動時に前回のウィンドウとタブを開く
user_pref("browser.tabs.loadInBackground", false); // リンクを新しいタブで開いたとき、すぐにそのタブに切り替える
user_pref("browser.tabs.loadBookmarksInTabs", true); // ブックマークを新しいタブで開く
user_pref("browser.tabs.closeWindowWithLastTab", false); // 最後のタブを閉じたあともウィンドウを開いたままにする
user_pref("browser.tabs.warnOnClose", false); // 複数のタブを閉じるときにダイアログを表示しない

user_pref("general.autoScroll", false); // 自動スクロール機能を使用しない
user_pref("general.smoothScroll", false); // スムーススクロールを無効にする

user_pref("intl.accept_languages", "ja,en"); // 言語の優先順位(Accept-Language)を設定する

user_pref("layout.spellcheckDefault", 0); // 自動スペルチェック機能を使用しない

user_pref("signon.rememberSignons", false); // ウェブサイトのログイン情報とパスワードを保存しない
その他、メニューの[設定]から以下の設定を行う。
- [検索]タブ
-
- [ワンクリック検索エンジン]
- 不要な検索エンジンを選択解除あるいは削除
Thunderbird
user.jsを作成して以下の内容を記述しておく。
user_pref("general.smoothScroll", false); // スムーススクロールを無効にする
user_pref("mail.mdn.report.enabled", false); // 開封確認を送信しない
user_pref("mail.default_send_format", 1); // 送信テキスト形式を「プレーンテキスト形式のみ」にする
user_pref("mail.server.default.mdn_report_enabled", false); // (新規に作成されるアカウントに対して)開封確認を送信しない
user_pref("mail.server.default.offline_download", false); // (新規に作成されるアカウントに対して)メッセージの同期を無効にする
user_pref("mail.server.default.check_all_folders_for_new", true); // すべてのIMAPフォルダの新着メールをチェックする
// アカウントごとの設定の既定値
user_pref("mail.identity.default.compose_html", false); // デフォルトの送信フォーマットでHTMLを無効にする(=プレーンテキストにする)
user_pref("mail.identity.default.archive_enabled", false); // アーカイブを無効にする
// 迷惑メール
user_pref("mail.spam.manualMark", true); // 「迷惑マークが付いたときに次の処理を実行する」
user_pref("mail.server.default.moveOnSpam", true); // 「迷惑メール」フォルダーへ移動する
user_pref("mailnews.ui.junk.manualMarkAsJunkMarksRead", true); // 「手動で迷惑マークを付けたとき」既読にする
user_pref("mail.spam.markAsReadOnSpam", false); // 「Thunderbirdが迷惑メールと判断したとき」既読にしない
user_pref("mail.spam.logging.enabled", true); // 迷惑メール適応フィルターのログを有効にする
// メールの並べ替えの順序・種類
// ref: https://superuser.com/questions/13518/change-the-default-sorting-order-in-thunderbird
user_pref("mailnews.default_sort_order", 1); // ソート順を昇順(古いものが上)にする(降順は2)
user_pref("mailnews.default_sort_type", 35); // ソート種類を「受信順」にする
user_pref("mailnews.default_view_flags", 1); // スレッド化する
システムモニタアプレット(system-monitor-next)のインストール
まずgir1.2-gtop-2.0をインストールする。
$sudo apt install gir1.2-gtop-2.0
GNOME Shell Extension Managerを起動するか、右記のURLを開いて、system-monitor-nextをインストールする。
ZIPファイルからコマンドラインでインストールする場合は次のようにする。
zipファイルを使ってインストールする
$gnome-extensions install system-monitor-nextparadoxxx.zero.gmail.com.v86.shell-extension.zip

インストールされたかどうか確認する
$gnome-extensions list

インストールした拡張を有効にする
$gnome-extensions enable system-monitor-next@paradoxxx.zero.gmail.com
開発環境の設定
Postfix
autoinstall.yamlでのubuntu-desktop-minimalのインストールでは、インストール中に構成ウィザードなどは表示されないので、インストール完了後に設定ファイルを修正する必要がある。
/etc/postfix/main.cfを編集し、リレーサーバとして構成する場合はrelayhost, smtpd_relay_restrictions, smtp_helo_name, inet_interfacesなどを調整する。 その他、詳細は省略。
smtp_helo_name = mail.example.com
relayhost = mail.example.com
smtpd_relay_restrictions = permit_mynetworks
inet_interfaces = loopback-only
設定をリロードする。
$sudo service postfix reload
git-daemon
git-daemonをsystemdサービスとして動作させる。
まず、git-daemon用にユーザーとグループを追加しておく。 (ここではそれぞれIDに602番を用いる)
$sudo groupadd -g 602 git
$sudo adduser --uid 602 --ingroup git --disabled-login --disabled-password --no-create-home --shell /usr/sbin/nologin --gecos "" git
リポジトリを格納するディレクトリがまだない場合は、作成する。
$sudo -u git mkdir -p /srv/repos/git
次にgit-daemonをsystemdサービスとして動作させるために、以下の内容でユニットファイルを作成する。
[Unit]
Description=Git Daemon

[Service]
ExecStart=/usr/lib/git-core/git-daemon --export-all --reuseaddr --enable=receive-pack --base-path=/srv/repos/git

User=git
Group=git

IPAddressDeny=any
IPAddressAllow=127.0.0.1 192.168.1.0/24

Restart=always
RestartSec=500ms

StandardOutput=journal
StandardError=journal
SyslogIdentifier=git-daemon

[Install]
WantedBy=multi-user.target
systemctl start git-daemonでサービスを起動し、systemctl status git-daemonで状態を確認する。
$sudo systemctl start git-daemon
$sudo systemctl status git-daemon
● git-daemon.service - Git Daemon
     Loaded: loaded (/etc/systemd/system/git-daemon.service; disabled; preset: enabled)
     Active: active (running) since Sat 2024-07-27 03:07:33 JST; 4s ago
   Main PID: 12785 (git-daemon)
      Tasks: 1 (limit: 38066)
     Memory: 1.1M (peak: 1.3M)
        CPU: 17ms
     CGroup: /system.slice/git-daemon.service
             └─12785 /usr/lib/git-core/git-daemon --export-all --reuseaddr --enable=receive-pack --base-path=/srv/repos/git
この状態でgit clone等が動作するか確認する。
動作に問題がなければ、systemctl enable git-daemonでブート時に自動的に起動するようにする。
$sudo systemctl enable git-daemon
Created symlink /etc/systemd/system/multi-user.target.wants/git-daemon.service → /etc/systemd/system/git-daemon.service.

$sudo systemctl status git-daemon
● git-daemon.service - Git Daemon
     Loaded: loaded (/etc/systemd/system/git-daemon.service; enabled; preset: enabled)
     Active: active (running) since Sat 2024-07-27 03:07:33 JST; 23s ago
   Main PID: 12785 (git-daemon)
      Tasks: 1 (limit: 38066)
     Memory: 1.1M (peak: 1.3M)
        CPU: 17ms
     CGroup: /system.slice/git-daemon.service
             └─12785 /usr/lib/git-core/git-daemon --export-all --reuseaddr --enable=receive-pack --base-path=/srv/repos/git
udev
USBデバイス等のためのudevルールファイルを作成する。
PHP
PHP 8.5の設定。 またFastCGIでPHPを使用するための設定など。
mbstringを有効にする
デフォルトではmbstringモジュールがインストールされていないので、インストールする。
$sudo apt install php-mbstring
/etc/php/8.5/fpm/php.iniあるいは/etc/php/8.5/cli/php.iniを編集して、コメントアウトされているextension=mbstringを有効にする。
-;extension=mbstring
+extension=mbstring
phpinfoを表示して、mbstringがenabledになっていればOK。
FastCGI
FastCGIでPHPスクリプトを動作させる場合は、/var/run/php/php-fpm.sockを使用する。 nginxの場合は以下のように設定する。
server {
    :
    :
  location /index.php {
    # デフォルトの設定をincludeする
    include snippets/fastcgi-php.conf;

    # PHP FPMのunix socketのパスを指定する
    fastcgi_pass unix:/var/run/php/php-fpm.sock;
      :
      :
  }
}
トラブルシューティング・未解決問題
現時点では特になし。